Quick setup using the bundled Car Controller
The Car Engine Controller is a simple component that you can add to your vehicle prefab, it will automatically add all the required components and setup the vehicle for you.
Adding to your prefab
To add YACC's Car Engine Controller to your vehicle, simply choose the Car Engine Controller inside your Component > YACC > Car > YACC Engine Controller in the dropdown menu on top of your editor window.
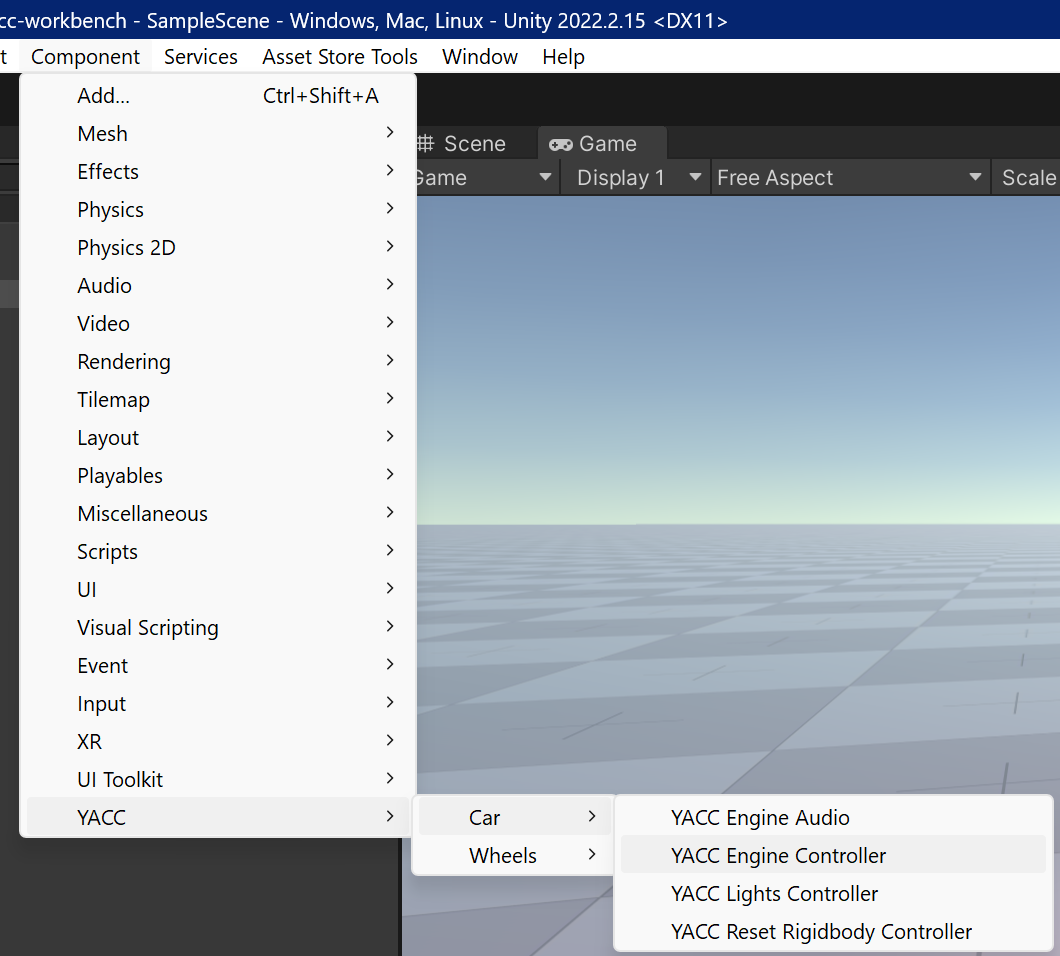
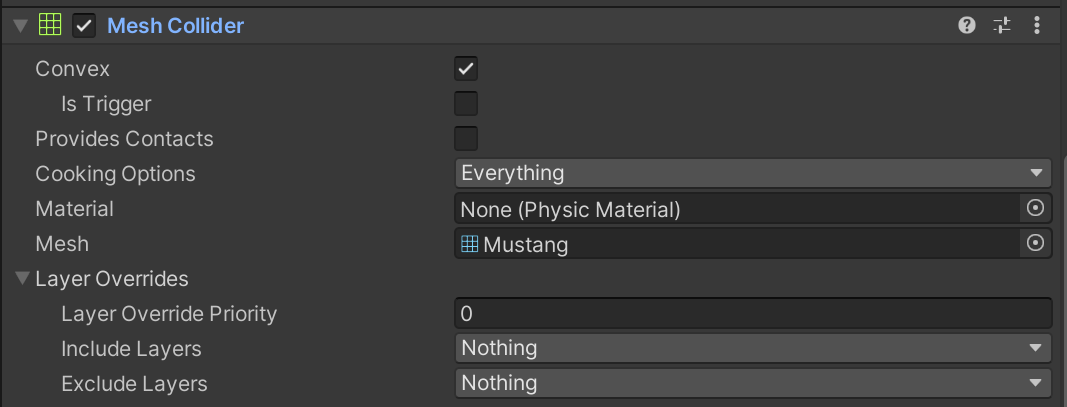
The editor will add automatically some required components for you, for example the Rigidbody, remember to change the mass and drag values to match your vehicle and to add a mesh collider to your vehicle's body.
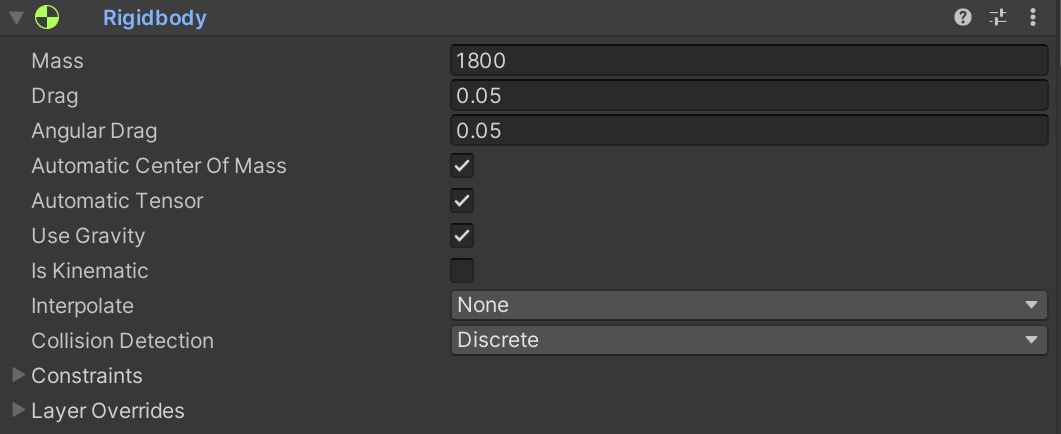
Linear drag as opposed to angular drag is the drag applied to the rigidbody's velocity, this is important to simulate air resistance and friction, without it your car will accelerate as it would be encased in a void space. The value is up to you, the higher the value the more drag will be applied to the rigidbody's velocity, a good starting point is 0.05. For a bigger vehicle like a truck with a lot of surface air resistance you can go up to 0.1 or even 0.2. For a small and aerodynamic vehicle like a formula 1 car you can go as low as 0.01.
Setup
The Car Controller component is divided in 3 main sections:
- Input settings: This section is used to setup the inputs, it requires the new input system to be active on the project. It allows you to change the input actions for the steering, throttle, brake and gear shifting. To setup a new input system mapping refer to Unity's documentation or import the sample scene from the package.
- Engine: This section is used to setup the engine, it allows you to change the engine's peak torque, RPM limits and generic input settings.
- GearBox: This section is used to setup the gearbox, it allows you to reference the gears and change the gear ratios.
- Wheels: This section is used to setup the wheels, it allows you to reference the wheel gameobjects, brake power, traction wheels and steer angles.
Engine
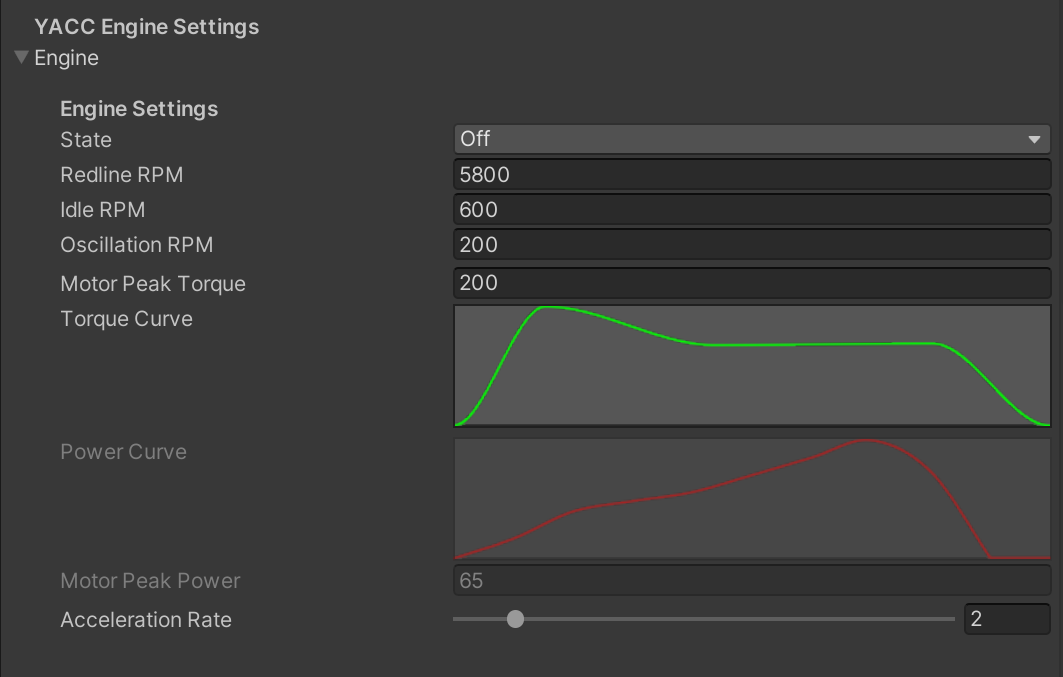
- State: The starting engine state, can be off or on, if set to on the engine will start running as soon as the game starts. If you want to change it on runtime you can use the StartEngine and StopEngine methods. Refer to the api documentation for more information.
- Redline RPM: The RPM limit of which the car starts to enter the redline, all torque generated after this will drop to zero. This is not the maximum limit of the engine, as it is calculated independently from the RPM red line.
- Idle RPM: The RPM of the engine when the car is not moving.
- Oscillation RPM: This is used to simulate the engine's natural's oscillation. The value is the maximum RPM the engine can oscillate from the idle RPM. For example if the idle RPM is 1000 and the oscillation RPM is 200, the engine will oscillate between 800 and 1200 RPM.
- Motor Peak Torque: The maximum torque the engine can generate at the peak torque curve. Force is measured in NM (Newton Meters).
- Torque Curve: The torque curve of the engine, this is used to calculate the torque generated by the engine at a given RPM. The curve is a simple animation curve, the X axis is the RPM and the Y axis is the torque generated at that RPM. The curve is also used to calculate the maximum torque the engine can generate at the peak torque curve.
- Power curve and motor peak power: Read only, calculated from the torque curve settings above. This is for your reference only, the engine power value is provided in KW (Kilowatts).
- Acceleration rate: The acceleration rate of ramping up RPM to the limit, higher the value, quicker the engine will respond to the throttle.
GearBox
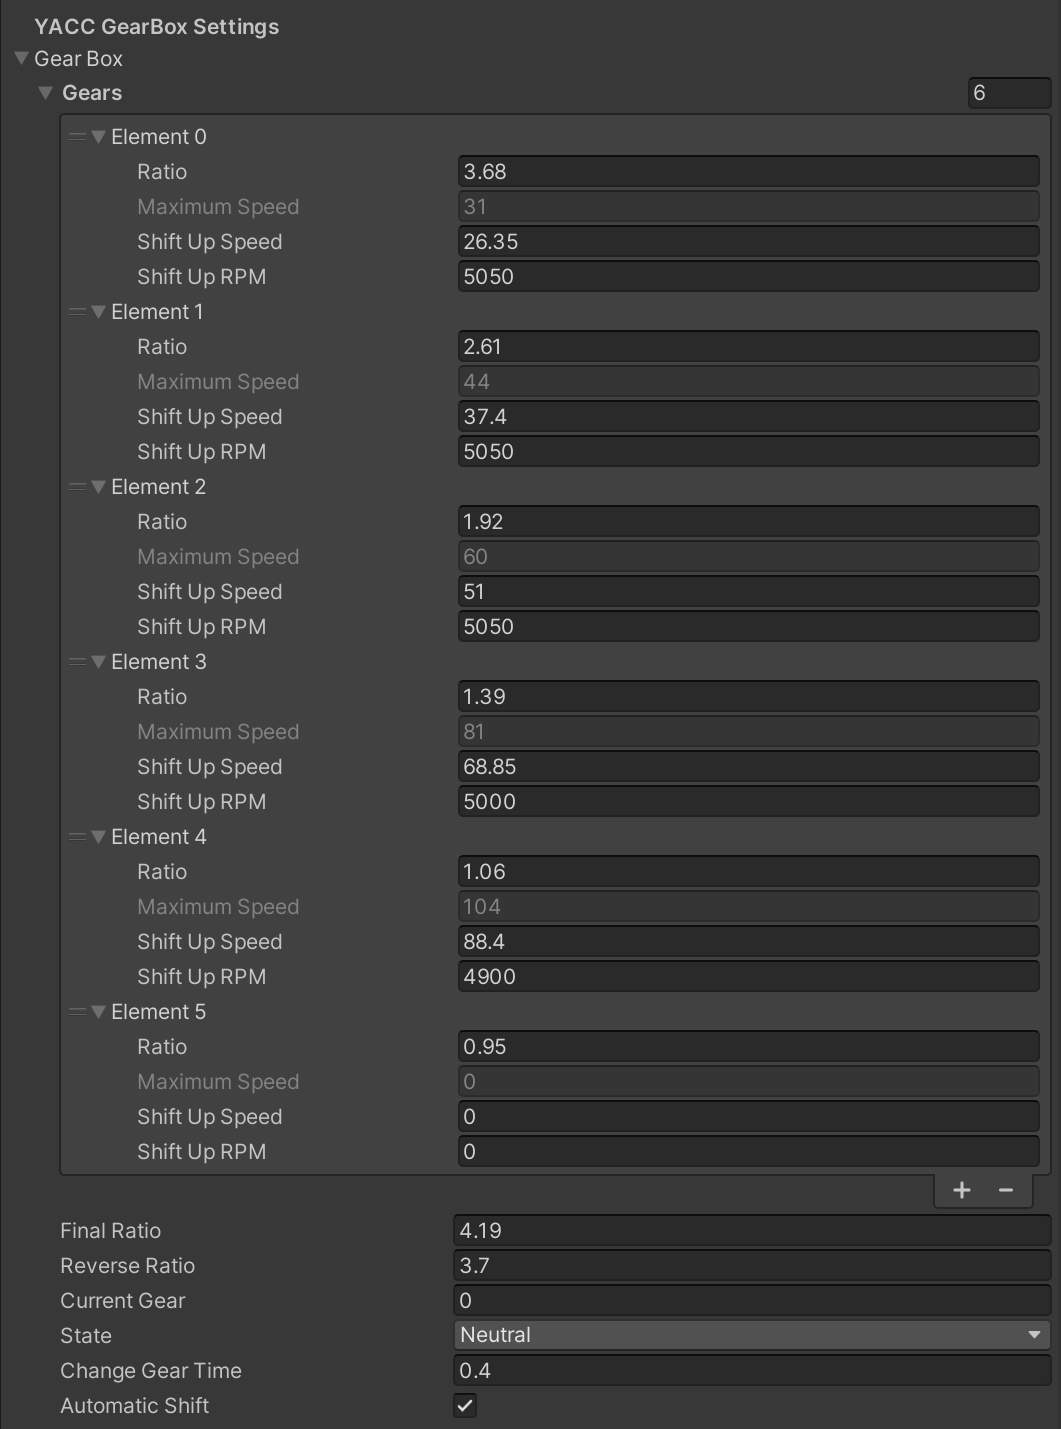
- Gears: A list of the gears in the gearbox each gear has its own settings such as:
- Ratio: The gear ratio of this gear, this is used to calculate the motor torque at a given engine RPM.
- Maximum speed: Read only, maximum theoretical speed of this gear.
- Shift up Speed: The speed at which the gearbox will shift up to the next gear. Valid for all gears except the last one. Used as a helper for automatic shifting.
- Shift up RPM: The RPM at which the gearbox will shift up to the next gear. Valid for all gears except the last one. Used as a helper for automatic shifting.
- Final drive ratio: The final drive ratio of the gearbox.
- Reverse gear ratio: The reverse gear ratio of the gearbox.
- Current gear: Current gear from -1 to the maximum gear setup in the gears list.
- State: The current state of the gearbox, can be off, neutral, reverse.
- Change gear time: The time it takes to change gear in seconds.
- Automatic shifting: If enabled the gearbox will automatically shift up and down based on the shift up speed and shift down speed of the current gear. If disabled the gearbox will stay in the current gear until the player manually shifts up or down.
Wheels
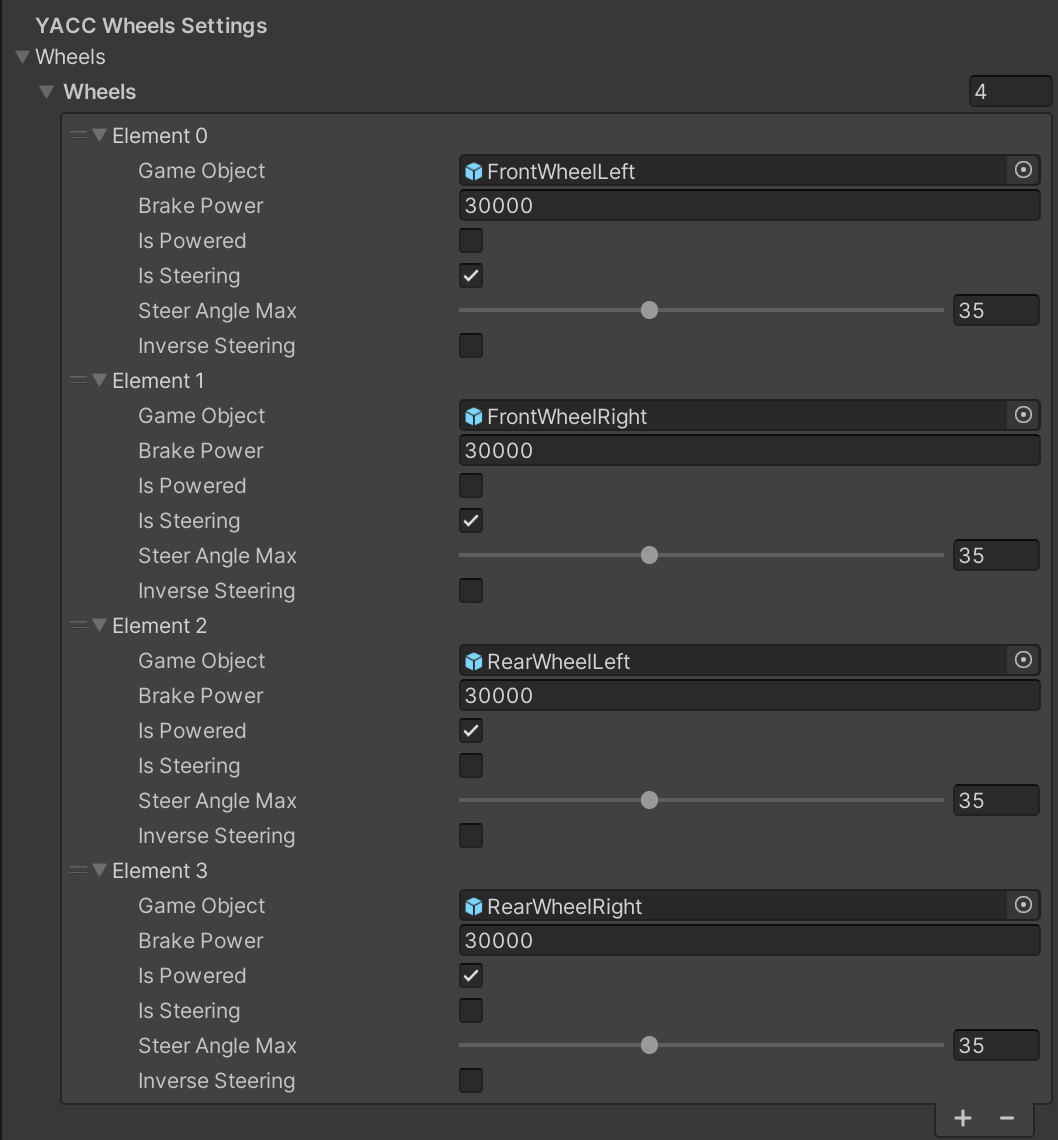
- Wheels: A list of the wheels in the car, each one has its own settings:
- Game Object: The wheel gameobject, this is used to reference the wheel collider and the visual wheel.
- Brake Power: The brake power of this wheel, this is used to calculate the brake torque applied to the wheel.
- Is Powered: If enabled the wheel will apply torque to the wheel collider.
- Is Steering: If enabled the wheel will steer the car.
- Steer Angle Max: The maximum angle the wheel can steer.
- Inverse steering: If enabled the wheel will steer in the opposite direction.
Every car has it's own suspension distance, stiffness and damping, and most importantly wheel radius. Remember to change the wheel collider settings to match your car's model and wheel radius.
Generic troubleshooting
My car shoots into the sky
Make sure your rigidbody mass is not too low. A good starting point for a generic car is around from 800kg to 1000kg. Some cars can weigh up even more than 2 tonnes, so make sure your vehicle is not too light.
My car overturns easily
Probably your automatic computed center of mass is too high, a way to fix this is to manually set the center of mass to a lower position, you can do this by setting the Rigidbody's Center of Mass property or you can add a child gameobject to your car called "CenterOfMass" and move it in your editor. As an extra precaution you can also tweak the distance of your suspensions and the stiffness of your springs.
My car does wheelies when accelerating
Your center of mass is probably too far back and/or the vehicle is still too light and you have a powerful engine with extreme traction on your wheel colliders, either try to move the center of mass forward a bit, increase the mass of your vehicle or reduce the traction of your wheel colliders.
My car goes through the ground
You're missing a mesh collider on your car body mesh, the collider doesn't need to be attached at the same gameobject of the controller, it can be a child of it if your model is organised differently. The important thing is that it should be there and it needs to collide with the ground.
My wheels are not rotating
Make sure your wheel gameobjects are placed directly as a child of your rigidbody, this is a limitation of Unity and not this script. Take as an example the following hierarchy:
Car
├── Wheel Front Left
├── Wheel Front Right
├── Wheel Rear Left
└── Wheel Rear Right
Wheel colliders are missing
If you edited the controller or using a custom script make sure the Controllers' OnValidate method calls the YACC.Wheels OnValidate method, this will automatically add the wheel colliders for you on your editor. If you plan to create cars via code make sure this method is called after you added the wheel gameobjects to the controller since the OnValidate method only runs in the editor and not on the built player.
Found an issue?
- Does the rigidbody have a realistic mass? Set a good mass for a vehicle
- Does the rigidbody have linear and angular drag set? If switched off your car can spin and accelerate without resistance
- Does the rigidbody have the kinetic option switched off? If not switch it off
- Does the prefab have a meshcollider component for the body? If not create one where appropriate
- Have you read and tried everything in the Troubleshooting chapter?
Have you done all the checks and still have an issue?
Please report it via e-mail